Imagine standing by a stunning waterfall, mesmerized by the glistening streams of water cascading down. Have you ever wanted to capture that magical moment in a photograph? Well, look no further! In this article, you will discover valuable tips and techniques on how to photograph moving water, enabling you to freeze those dynamic droplets and create captivating images that capture the essence of movement and tranquility. So grab your camera and let’s get started on this exhilarating photographic journey!
Equipment
When it comes to photographing moving water, having the right equipment is essential. Let’s go over some of the key tools you’ll need.

DragonfliesAndLadybugs for more.
Camera
First and foremost, you’ll need a good quality camera. While any camera can work, a DSLR or mirrorless camera with manual settings will give you more control over your shots. These cameras also tend to have better image quality and low-light capabilities.
Lens
Choosing the right lens can greatly impact your water photography. For capturing the details of moving water, a wide-angle lens can help you create a sense of scale and depth. Additionally, a telephoto lens can be handy for zooming in on specific areas or capturing more distant waterfalls.
Tripod
Since you’ll be working with longer shutter speeds to capture the smooth flow of water, a sturdy tripod is a must. This will ensure your camera remains stable and your images turn out sharp and without blur. Look for a tripod that’s lightweight, easy to carry, and has a ball head for easy adjustments.
Neutral Density Filters
Neutral density (ND) filters are like sunglasses for your camera. They reduce the amount of light entering your lens, allowing you to use longer shutter speeds even in bright conditions. This is especially helpful when photographing waterfalls, as it helps create that coveted silky smooth effect.
Choosing the Right Location
Now that you have your equipment ready, let’s talk about finding the perfect location to capture moving water.
Scenic Spots
When it comes to photographing water, scenic spots are always a great choice. Look for areas with unique or interesting features such as rock formations or reflections. These spots will not only add visual interest to your images but also help tell a story about the location.
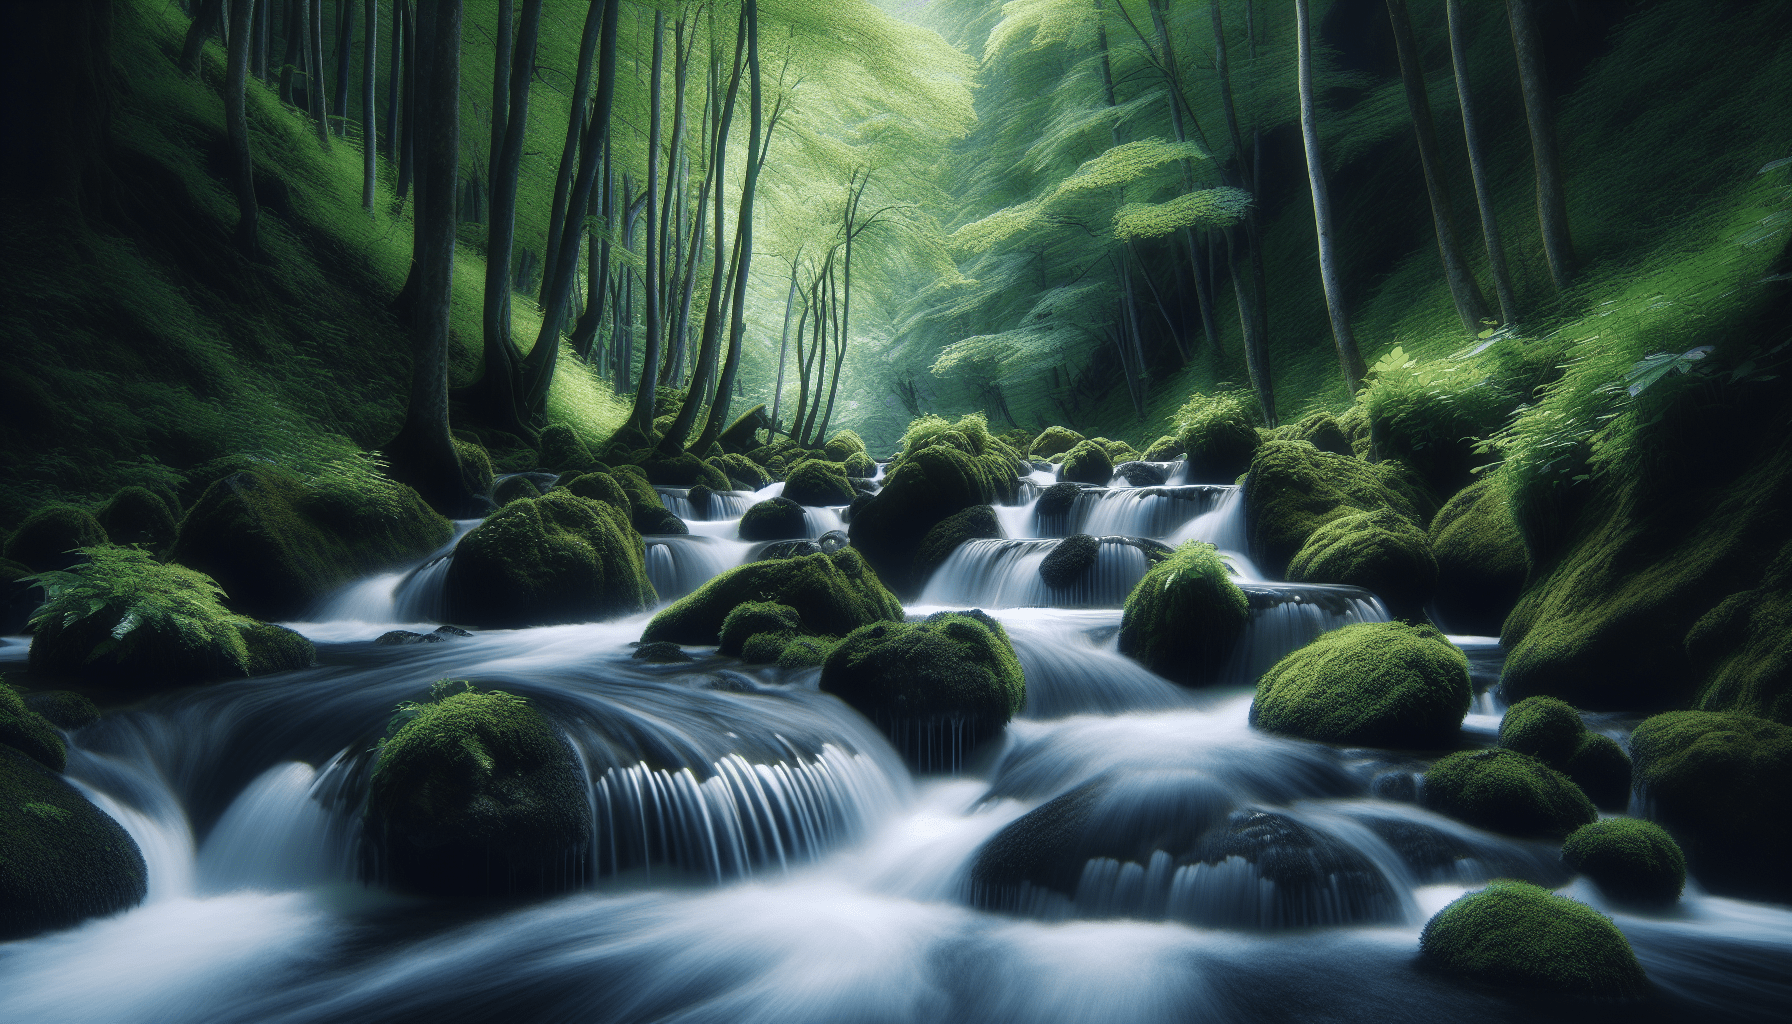
Waterfalls
Waterfalls offer a fantastic opportunity to capture the dynamic and powerful nature of moving water. Look for waterfalls with various cascades or interesting angles. Experiment with different shutter speeds to achieve different effects, from freezing the motion to creating that dreamy, blurred look.
Rivers or Streams
Rivers and streams provide a more serene and tranquil atmosphere for your water photography. Look for areas with gently flowing water and interesting patterns. In these settings, a longer exposure can create a silky smooth effect, emphasizing the water’s movement and creating a calming visual.
Beaches
Beaches offer a unique perspective on capturing moving water. Look for shorelines with crashing waves or gentle ripples. Experiment with slower shutter speeds to capture the motion of the water and faster speeds to freeze the action. Don’t be afraid to get close to the water and experiment with different angles for interesting compositions.
Camera Settings
Now that you’re in the perfect location, let’s dial in the right camera settings to capture stunning images of moving water.
Shutter Speed
Controlling the shutter speed is crucial when photographing moving water. A fast shutter speed (1/250 or faster) will freeze the motion, capturing every droplet of water in sharp detail. On the other hand, a slower shutter speed (1/15 or slower) will create a soft, flowing effect, blurring the water and conveying a sense of movement.
Aperture
The aperture setting determines the depth of field in your photographs. A smaller aperture (higher f-stop number) like f/16 or f/22 will increase the depth of field, keeping both the close-up water drops and the distant elements in focus. If you want to isolate the water and create a more shallow depth of field, use a wider aperture (lower f-stop number) like f/2.8 or f/4.
ISO
ISO determines the sensitivity of your camera’s image sensor to light. In well-lit scenarios, using a low ISO (100-400) will help produce cleaner, less noisy images. However, in low-light situations, you may need to increase the ISO (800-3200) to maintain a proper exposure. Just be mindful of the potential for increased noise at higher ISO settings.
Metering Mode
Different metering modes can affect how your camera exposes for the scene. Evaluative metering takes into account the entire frame, while center-weighted metering prioritizes the center of the frame. Spot metering, on the other hand, measures the exposure based on a small area around your focus point. Experiment with these modes to achieve the desired exposure for your water photography.
Using a Tripod
Now that you have your camera settings dialed in, let’s talk about the importance of using a tripod when photographing moving water.
Stability
Using a tripod ensures the stability of your camera during longer exposures, preventing any camera shake. This is especially crucial when working with slower shutter speeds to capture the flow and movement of water. Make sure your tripod is properly set up on a stable surface, and use a remote shutter release or the camera’s self-timer to minimize any vibrations.
Composition
A tripod allows you to take your time and carefully compose your shots. Pay attention to the placement of the water in your frame and consider using leading lines or the rule of thirds to create visually appealing compositions. Take your time to experiment with different angles and perspectives to capture the water in a unique and engaging way.
Long Exposures
Using a tripod opens up the possibility of creating stunning long exposure shots of moving water. By using slower shutter speeds, you can transform choppy waves or rushing water into smooth, ethereal flows. To achieve this effect, set your camera to a slow shutter speed (1/15 or slower) and use a neutral density filter to reduce the amount of light entering the lens. This will result in that dreamy, silky effect that characterizes long exposure water photography.
Working with Shutter Speed
Shutter speed plays a crucial role in capturing the motion of water. Let’s explore how you can use it to freeze or blur the movement for different effects.
Freezing Motion
If you want to capture the details of flowing water, using a fast shutter speed is essential. This allows you to freeze the motion and capture every droplet in sharp detail. Start with a shutter speed of around 1/250 or faster to ensure crisp results. Experiment with different speeds to find the one that best captures the action and energy of the water.

Blurring Motion
On the other hand, using a slower shutter speed can create a sense of calm and serenity in your images. By using a speed of 1/15 or slower, the moving water will appear soft and flowing. This effect works particularly well with waterfalls or gentle streams, allowing you to convey the sense of movement and create a dreamy, ethereal look in your photographs.
Utilizing Aperture
Aperture not only controls the exposure of your images but also plays a key role in determining the depth of field. Let’s delve into how you can use it effectively when photographing moving water.
Depth of Field
The aperture setting determines how much of your image is in focus, also known as the depth of field. When photographing moving water, you have the option to emphasize both the close-up details and the distant surroundings or isolate the water itself. A smaller aperture (higher f-stop number) like f/16 or f/22 will give you a larger depth of field, keeping both the close-up water drops and the distant elements in sharp focus. Conversely, a wider aperture (lower f-stop number) like f/2.8 or f/4 will create a more shallow depth of field, allowing you to isolate and emphasize the water.
Deciding on Focal Points
The aperture you choose will also affect where the viewer’s attention is drawn within your image. When using a smaller aperture, everything from the foreground to the background will be in focus. Use this to your advantage by carefully selecting focal points within the scene to guide the viewer’s eye. Experiment with different compositions and settings to create a sense of balance and visual interest in your water photography.
Understanding ISO
ISO plays a crucial role in determining the sensitivity of your camera’s image sensor to light. Let’s explore how it affects the quality of your water photography.
Noise
One of the main concerns when using higher ISO settings is the potential for increased noise in your images. Noise appears as grain-like specks and can degrade the overall quality of your photograph. To minimize noise, try to use the lowest ISO setting possible, usually between 100-400 in well-lit conditions. If you find yourself in low-light situations, you may need to increase the ISO (800-3200) to maintain a proper exposure, but be mindful of the potential for increased noise at higher settings.
Proper Exposure
Understanding how ISO affects exposure is also important when photographing moving water. If you’re shooting in low-light conditions, a higher ISO setting may be necessary to achieve a properly exposed image, even with slower shutter speeds and smaller apertures. Balancing the ISO with the other settings (shutter speed and aperture) allows you to capture the desired effect while maintaining a well-exposed photograph.
Metering Modes
Metering modes help determine how your camera exposes for the scene. Let’s explore the different metering modes and how they can impact your water photography.
Evaluative Metering
Evaluative metering, also known as matrix or multi-segment metering, measures the light across the entire frame. This mode takes into account various elements within the scene and calculates the exposure accordingly. It’s a versatile metering mode that works well in most situations, including capturing moving water. However, adjust your exposure settings as needed if the resulting exposure doesn’t match your creative vision.
Center-Weighted Metering
Center-weighted metering gives priority to the center of the frame when determining the exposure. This mode is particularly useful when you want to expose for a specific subject or element, such as the water itself. When framing your shot, ensure that the water or the most important part of the scene is in the center of the frame to get an accurate metering reading.
Spot Metering
Spot metering measures the exposure based on a small area around your focus point. This mode allows for precise control over the exposure, making it ideal for situations where your main subject or the moving water fills only a small portion of the frame. Use spot metering to meter for the specific area you want to expose correctly, and adjust your settings accordingly to capture the desired effect.
Composition
Composition is key to creating visually appealing images of moving water. Let’s explore some composition techniques that can elevate your water photography.
Leading Lines
Leading lines can guide the viewer’s eye through your image and emphasize the flow of water. Look for natural lines within the scene, such as rocks or shorelines, that can lead the viewer’s gaze towards the water or a specific focal point. Experiment with different angles and perspectives to make the most of these leading lines, creating a sense of depth and visual interest in your photographs.
Rule of Thirds
The rule of thirds is a fundamental composition principle that can help create balanced and visually pleasing images. Imagine your frame divided into a grid of nine equal parts, with two horizontal and two vertical lines intersecting. By placing points of interest, such as the main subject or areas of high activity within the water, along these lines or at their intersections, you can create a more engaging composition.
Framing
Framing is another powerful composition technique that can add depth and context to your water photography. Look for natural elements like trees, rocks, or arches that can frame the water and create a sense of enclosure. This not only draws attention to the moving water but also adds a sense of scale and narrative to your images. Experiment with different framing options to find the one that best complements your subject and enhances the overall composition.
Timing for the Best Shot
Timing is crucial when it comes to capturing the best shot of moving water. Let’s explore some ideal moments throughout the day and different weather conditions that can enhance your water photography.
Golden Hour
The golden hour, which occurs shortly after sunrise or before sunset, offers some of the most beautiful light for water photography. The warm, golden tones add a magical touch to your images, enhancing the colors and textures of the water. The soft, directional light during this time also helps create long shadows and more dynamic compositions. Plan your shoots around these hours for the best chance of capturing stunning photographs of moving water.
Cloudy Weather
While sunny days can provide beautiful lighting conditions, overcast or cloudy weather can also be beneficial for water photography. Clouds act as natural diffusers, softening the light and reducing harsh shadows. This can result in more evenly lit scenes, allowing you to capture the details and textures of the moving water without extreme contrasts. Cloudy weather also adds a moody atmosphere to your images, creating a different visual impact.
Midday Sun
Although shooting during the middle of the day can pose challenges with harsh light and strong contrasts, it can also provide unique opportunities for water photography. Embrace the harsh light and experiment with high shutter speeds to freeze the fast-paced motion of water. Look for subjects like crashing waves or splashing water that can be highlighted by the strong sunlight. By being creative and adapting to the conditions, you can still capture compelling images of moving water even in the harsh midday sun.
In conclusion, photographing moving water requires the right equipment, a good understanding of camera settings, and a well-composed shot. By choosing the right location, utilizing the power of shutter speed, aperture, and ISO, and considering the composition and timing, you can capture stunning images of moving water that convey its beauty, power, and tranquility. So grab your camera, head out to your favorite water spot, and let your creativity flow as you capture the mesmerizing world of moving water through your lens. Happy shooting!
Comments are closed